Tired of flimsy picnic tables? I was too. So I decided to get primal on some wood and built a picnic table from scratch with no power tools but an electric screwdriver. This table is a tank. It only took a couple of days to build but will last for generations.
1. The first thing to do is get some wood. You will need 8 2’x4’s, 13 2’x6’s, 16 1/4”x 4-1/2” galvanized carriage bolts with lock washers, flat washers and nuts and 108 2-1/2’ #8 flat head wood screws. You will also need some tools like a saw and sandpaper. Although I used a hand saw, a standard chop saw would make this project super easy and much more fun!
2. Using a table saw or miter box and hand saw, cut the legs of the table. The legs are cut in pairs, from two 8' lengths of 2X6 lumber. First, cut the 8' boards into four 4' boards. Now, mitre cut each end at 45 degrees so the ends are are parallel. This should result in four boards that each look like this:
3. The next step requires the most difficult measurement and cutting in the entire project. Using a combination square, measure back 1-3/4" along the mitre cut, from the pointy end of the board. Mark a line perpendicular to the mitre cut, which should end at the edge of the board, 1-3/4" across. Mark and cut these points off on all eight ends of the four legs. This completes cutting of the legs. You should have four legs that look like this:

4. The legs will be aligned with the two parallel mitre cuts facing the underside of the tabletop, and the ground. Under the table top, the two 1-3/4" high end faces will butt together. The other 1-3/4" faces represent the outermost extremities of the table. When the legs are aligned in this fashion, the distance between the outer ends of the opposing legs is found to be 68-11/16". This is the dimension we will use for the beam that supports the seats. This way, the outer edge of the seat will be plumb with the outer end of the legs, and the whole thing can be propped up on it's side without it falling over.

5. Now we need to make the beams that will hold the seats up. So, cut four 2X4 beams to this length, and then mitre cut the ends of the beams so the ends angle inward and downward on all eight ends, like this:

6. The seat beams will be used in pairs, one at each end, sandwiching the leg assemblies, like this. They will be attached at an elevation suitable for a final seat top height of 17". Really think about how high the seat should be for you. We had to raise ours up to about 20” after the fact which was a pain, but is doable. This means the top of the beam is at the 15-1/2" elevation. The final leg/beam assembly looks like this:

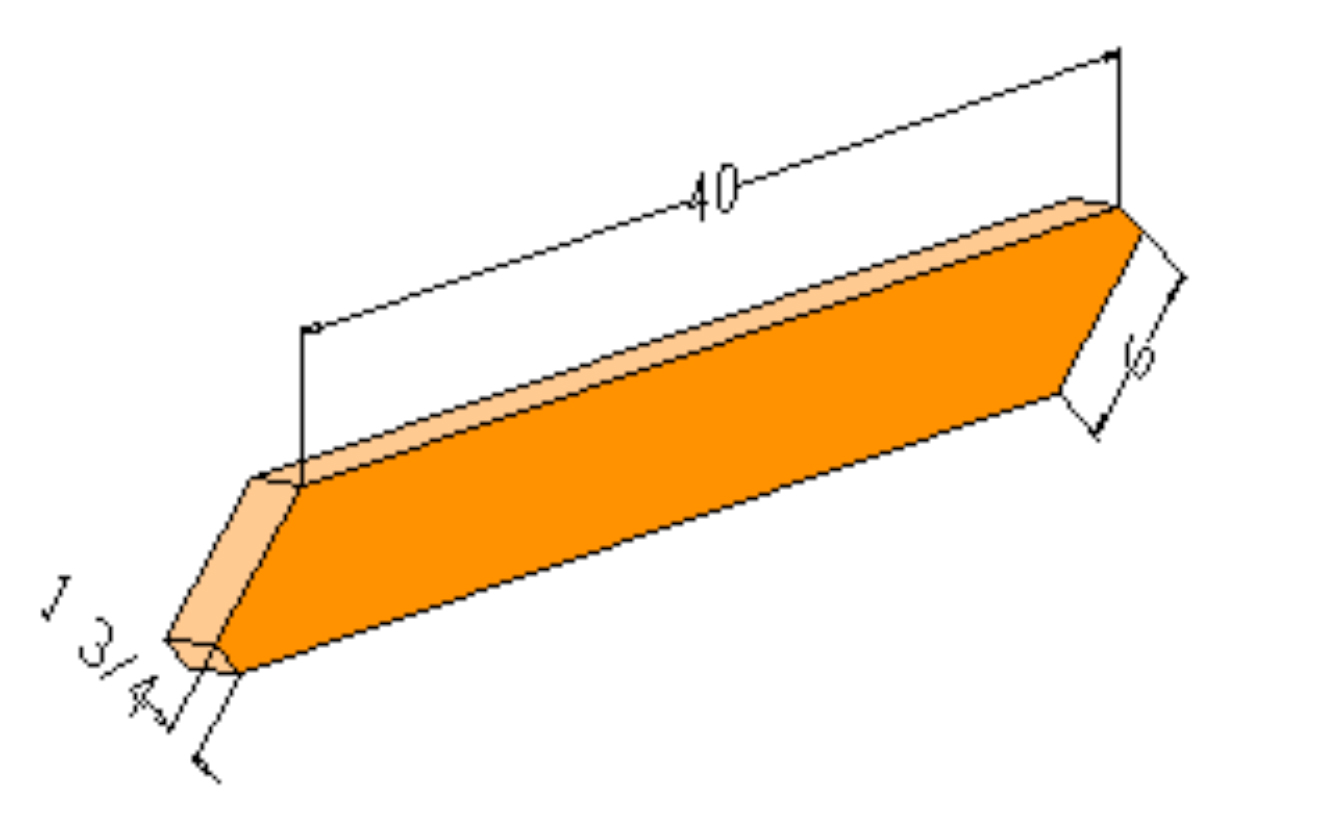
7. The drawing shows that the table top will be roughly 41" wide, and the seat tops 13" wide. Lets use the information we have to design the table top. The top will be supported by pairs of beams sandwiching the legs, just like the seat beams. If we construct the table top out of 2X6 planking, we can use 7 2X6's, set on 3/8" spacing, to yield a 40-3/4" wide top. So, using 2X6 lumber, cut four table top beams to 40-3/4", and mitre the ends, like we did for the seat beams. When the top beams are attached, the leg assemblies will look like this:
8. The only parts left to cut now are the table top and seat planks. The table is planked with 7 equal lengths of 2X6 lumber, and the seat tops are one 2X6 and a pair of 2X4's each. The length of the top and seat planks is pretty much whatever you want, but for this width of top, a typical top would work out in the 6-1/2' to 7' length. The leg assemblies will be situated anywhere from 10" to 16" inboard, depending on the overall length of the table. It may be possible for a small person to sit at the section outboard of the leg assembly on a large table.
The top is planked with the planking spaced evenly across the top beams. The seat is planked with the 2X6 plank flanked by two 2X4's. The spacing on the seat planks may be set to cover the entire space from the outer end of the seat beams to the edge of the leg, or the spacing may be set to match the spacing on the table top. In the latter case, the outer plank should be aligned with the end of the seat beam.
The top and seat planks may be cut to length now, or may be installed and trimmed after assembly. The latter method will ensure a nice straight alignment of the ends of all planks.
9. So far, all we've done is cut the wood to size, and look at how it all fits together. Now the actual assembly begins. Again, we begin with the legs. Lay a top beam and a seat beam flat on the floor or a large workbench. Lay a pair of legs on top of the beams, and then lay another pair of beams on top of the leg pieces. Use a framing square to ensure that the legs are exactly perpendicular at the corner where they meet. Measure the height of the seat beams from the bottom of the legs, using a straightedge laid across the bottoms of the legs. Wiggle everything into position, and drill 1/4" holes through both the beam & leg pieces at two locations where each pair of pieces connect to each other. On one side (the inboard surface) of one of the pairs of beams, use a 7/8" spade bit to counterbore about 3/8" deep. Use 1/4" X 4-1/2" carriage bolts with a flat washer and lock washer under each nut to fasten the leg assembly together. Take care to get everything aligned correctly, or the result will be a table that rocks on three legs.


10. Finally, screw the top and seat planking into place on top of the top beams and seat beams. Use 2-1/2" #8 flat head wood screws, and predrill and counterbore the holes so that the screws will be flush with the tabletop. Use two screws to fasten at each intersection of planks and beams. Use a ruler to mark off the locations of the screws, since the screw heads are going to be visible on the table top. If done neatly, and if rust proof screws are used, the screw heads do not detract excessively from the overall appearance. If the top and seat planks have been pre-cut, align the planking for equal overhang at each end. Otherwise, allow for enough overhang to trim each end equally, and trim all overhangs to the same length.


11. The picnic table assembly is now complete. To finish it off, give it a light sanding. You will want to protect your table and make it look nice. I went with a wood stain. Then came in with Thompson’s water seal. This will help protect the table from UV and water damage.

This is what the finished table looks like. You can modify the table in multiple ways to suit your needs. This design is extremely versatile, easy to build and sturdy.
Picnic Table Design 101 - Most of the step-by-step instructions were taken from this website. Lot of great information here.
